
How to send Email, WhatsApp and SMS to your ticket’s contact — day-to-day use.
MsgClub Connect lets your support team message a ticket’s contact over Email, WhatsApp and Text SMS — without leaving Zoho Desk. You can send one message, send in bulk, or let Alert Rules send messages automatically. This guide walks through each screen. A short line above every picture explains what that screen shows.
1. SEND A MESSAGE FROM A TICKET
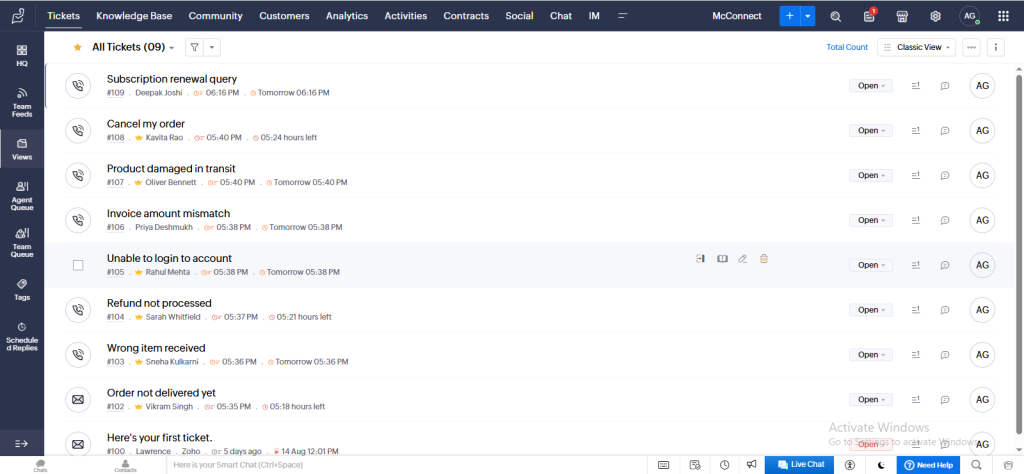
First, open the ticket you want to reply to.
Your Zoho Desk ticket list. Open any ticket to message its contact.
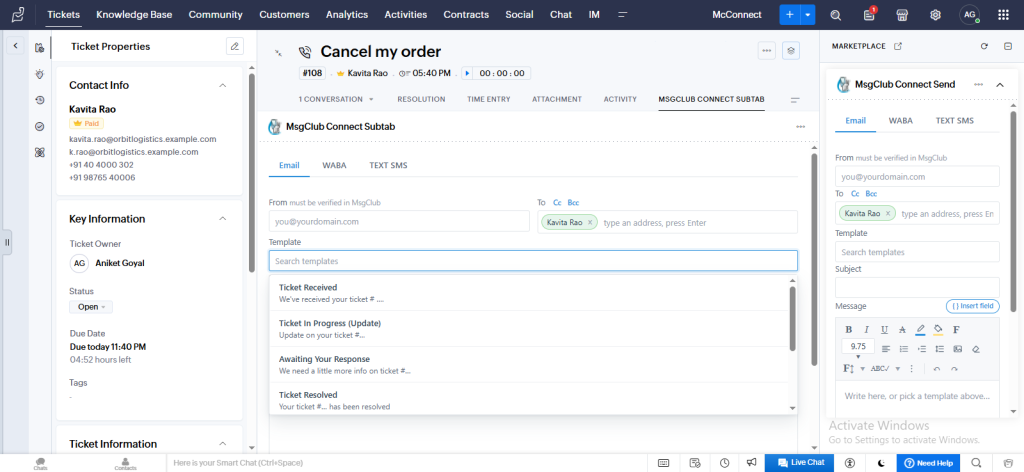
Inside the ticket there are two ways to send — both do exactly the same job (Email, WhatsApp or Text SMS). Use whichever is handier:
- MsgClub Connect Subtab — a wide tab in the middle of the ticket. Good when you want more room to write.
- MsgClub Connect Send panel — a compact panel on the right side of the ticket (the marketplace panel). Good for a quick message.
In both, the contact’s name, email and phone fill in automatically. The two red boxes below point them out.
Inside a ticket — the two ways to send. Box 1 is the MsgClub Connect Subtab (middle); box 2 is the MsgClub Connect Send panel (right). Both have Email, WABA and Text SMS tabs.
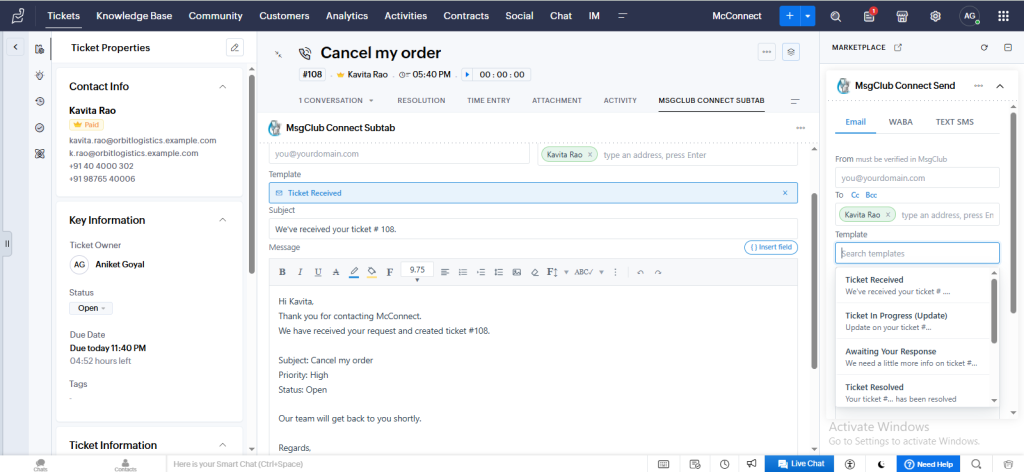
Choose a channel, pick a template (or type your message), then send:
Email tab with a template chosen. The subject and message fill in automatically, with the contact and ticket details already merged in. Edit if needed, then send.
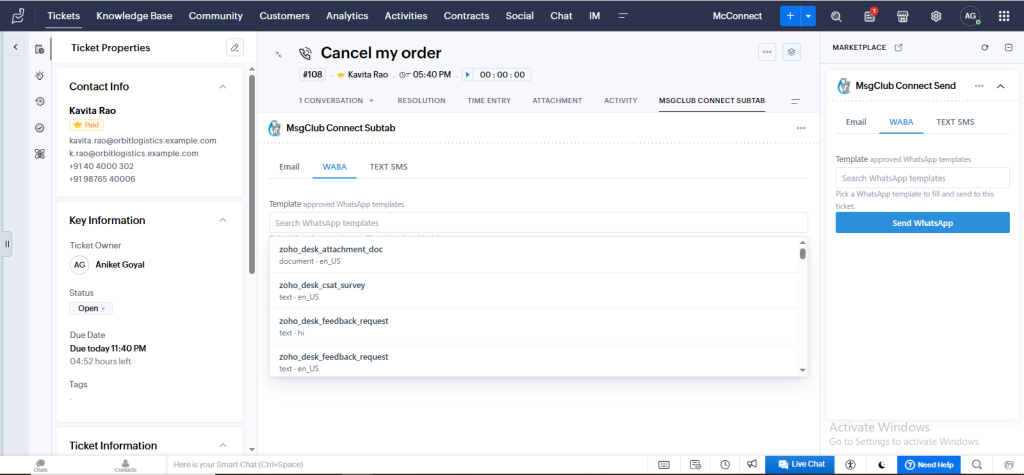
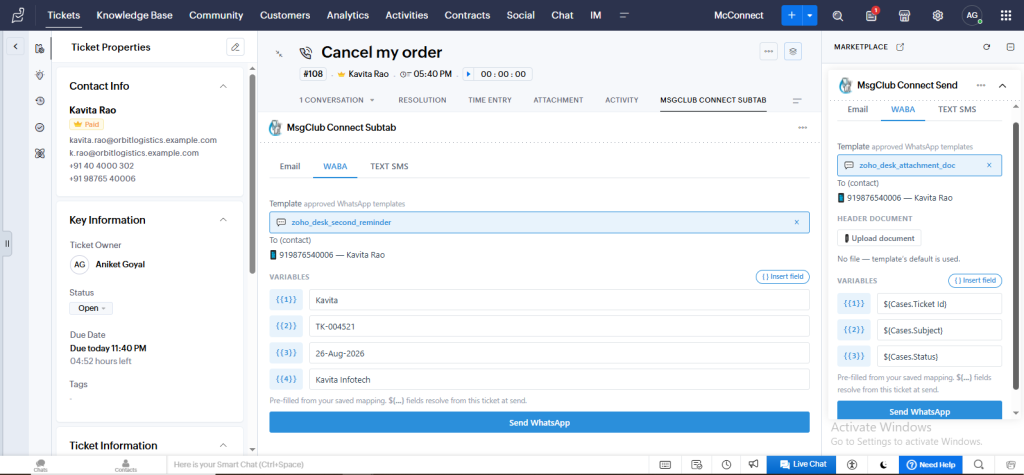
WABA (WhatsApp) tab. Search and pick one of your approved WhatsApp templates (they are named starting with zoho_desk).
After picking a WhatsApp template, the recipient and the template variables ({{1}}, {{2}}…) are pre-filled from your saved mapping. Check the values, then click Send WhatsApp.
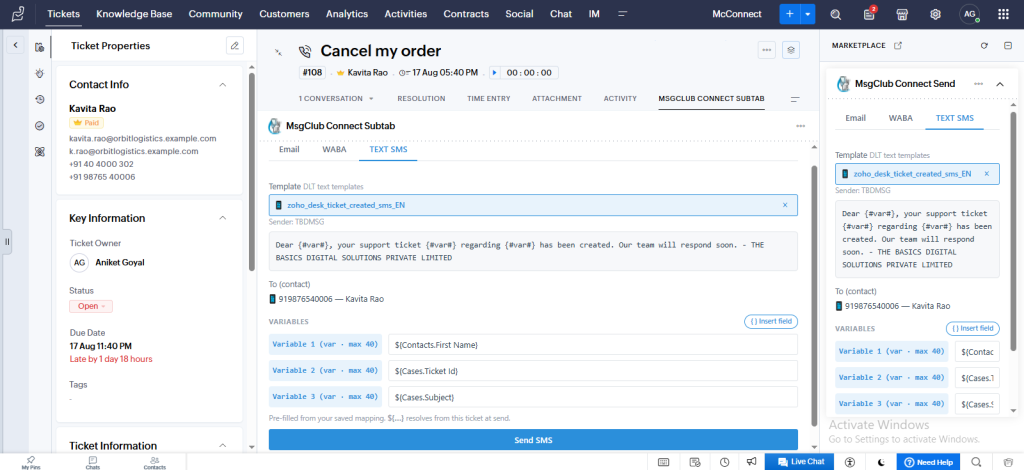
Text SMS tab. Pick a DLT-approved SMS template; the sender ID and variables fill in from your mapping. Click Send SMS.
A copy of every message is logged onto the ticket, so your team can see what was sent.
2. OPEN THE MSGCLUB CONNECT APP
Bulk Send, Alert Rules, and all your templates live in the full MsgClub Connect app. Open it from the top menu in Zoho Desk — click MsgClub Connect (it may sit under the “more” menu ≡ next to the other tabs).
The Zoho Desk top menu. Click MsgClub Connect to open the full app

3. EMAIL TEMPLATES
Create your common emails once (payment reminder, ticket update, thank-you…) and reuse them from any ticket or in Bulk Send.
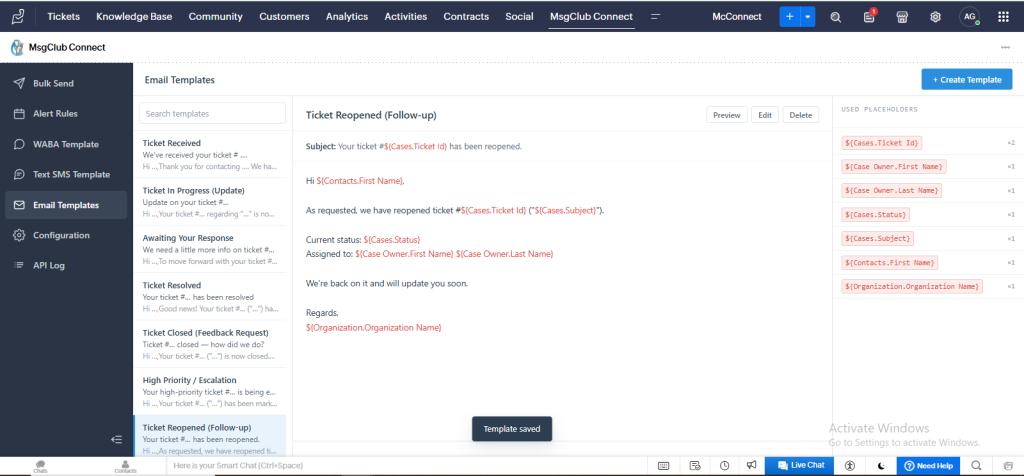
Email Templates screen. Your saved templates are on the left. Click + Create Template (top-right) to start a new one.
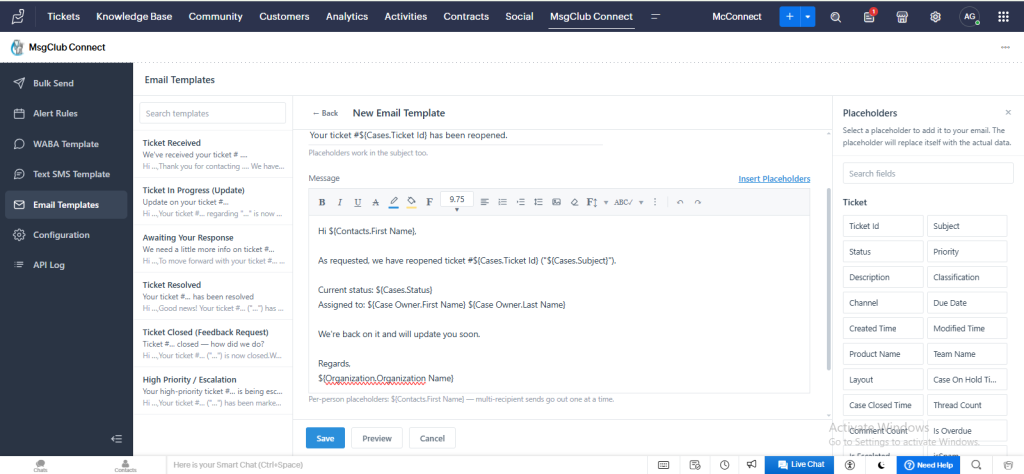
Enter a Template Name and Subject, then write the Message. Placeholders like ${Contacts.First Name} fill in automatically for each contact.
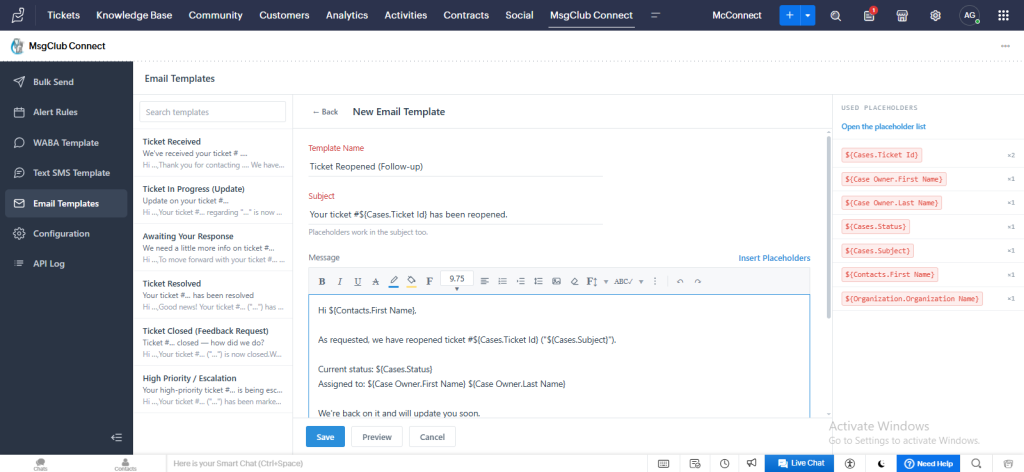
Use Insert Placeholders to add ticket and contact fields into the subject or message.
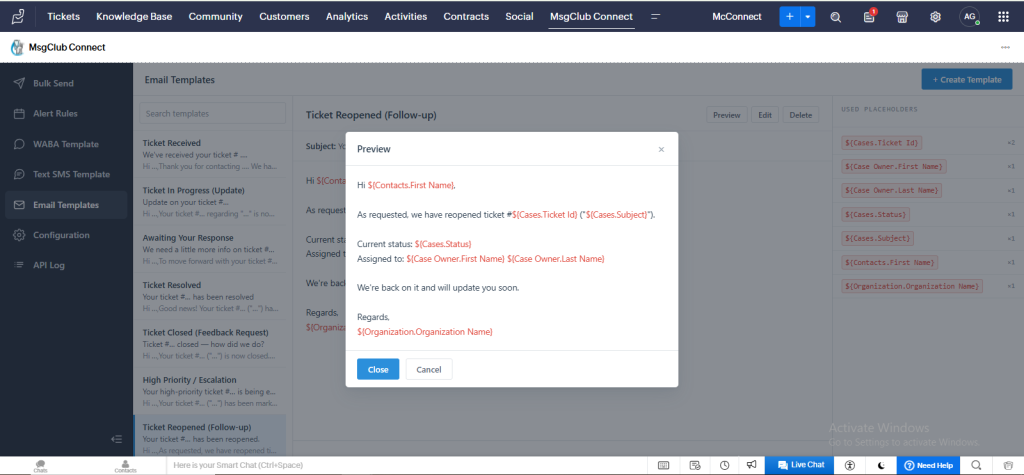
Preview shows how the email will look with the placeholders in place. Then click Save — the template appears in the left list, ready to use from any ticket or in Bulk Send.
4. WABA (WHATSAPP) TEMPLATES
Before you can send a WhatsApp template, map its blanks to ticket fields and save it once.
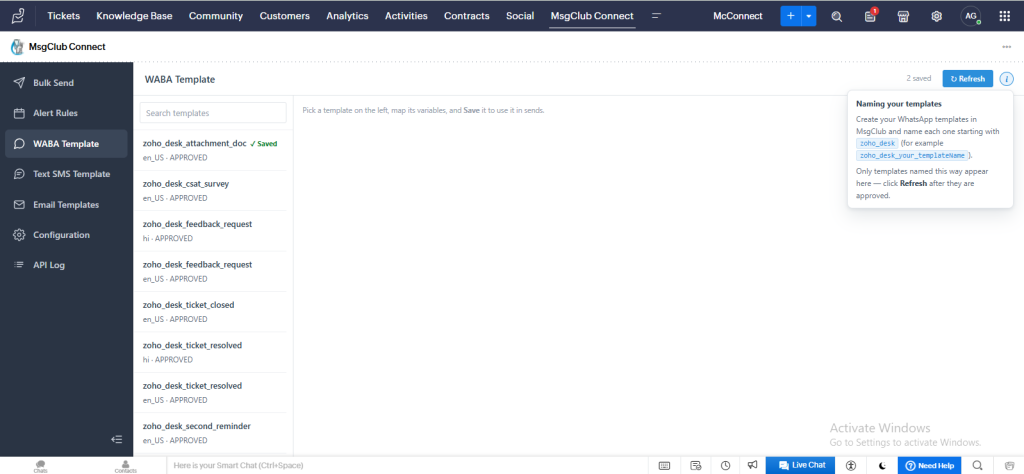
WABA Template screen. Your approved WhatsApp templates (named starting with zoho_desk) are listed on the left. The info box explains the naming rule — click Refresh after new templates are approved.
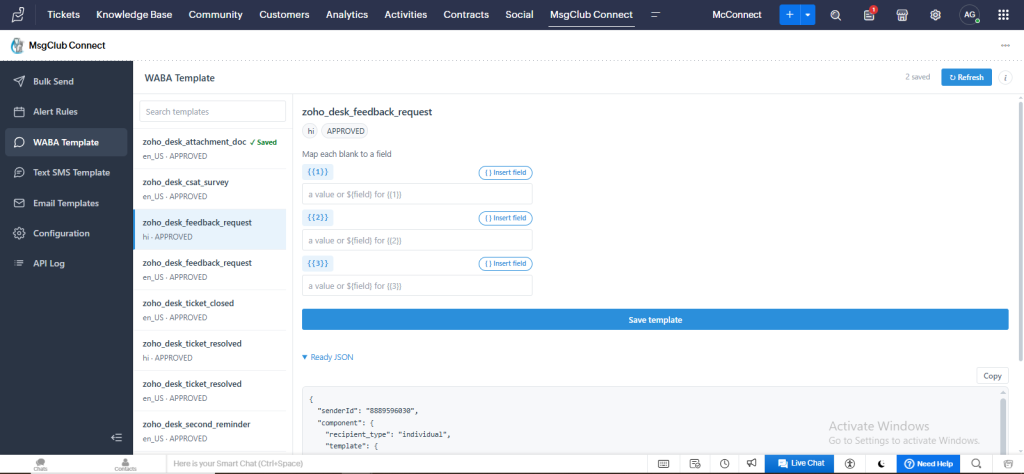
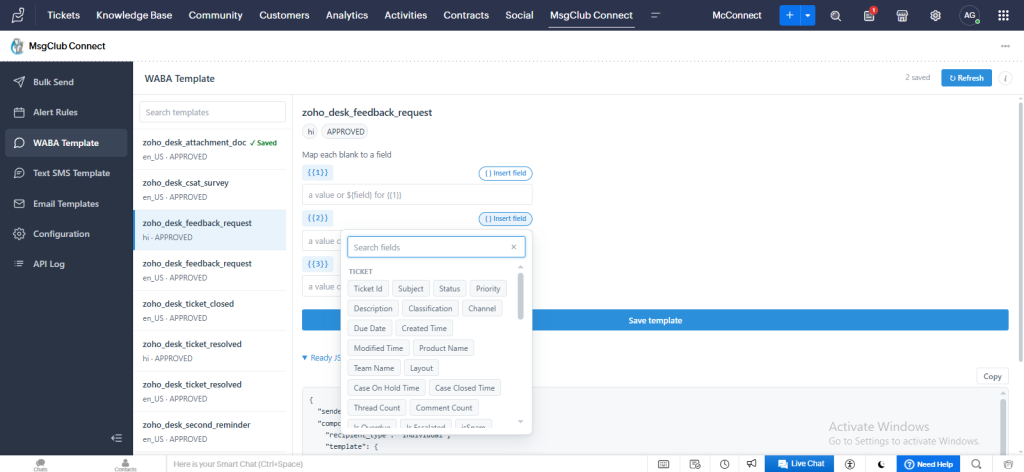
Pick a template to map its blanks. Each {{1}}, {{2}}, {{3}} is a blank you fill with a fixed value or a ticket field.
Click Insert field to choose a ticket field (Ticket Id, Subject, Status, Contact name…) for a blank.
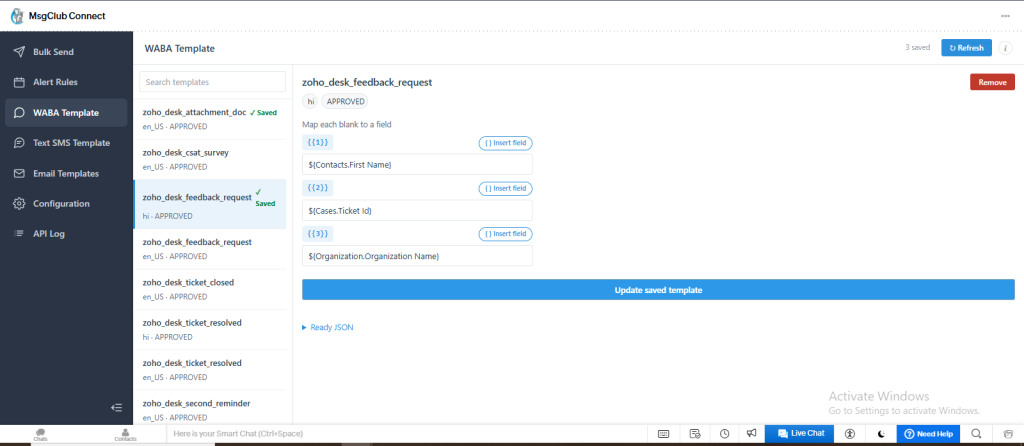
Mapping done — {{1}} → Contact First Name, {{2}} → Ticket Id, {{3}} → Organization Name. Click Update saved template. Saved templates show a green Saved tag and are ready to send.
5. TEXT SMS TEMPLATES
Same idea as WhatsApp — map each blank of your DLT-approved SMS template and save it once.
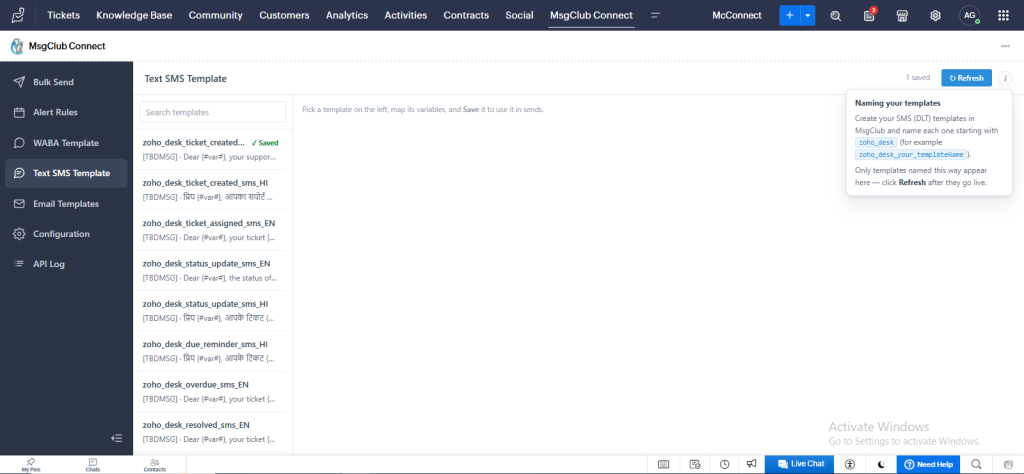
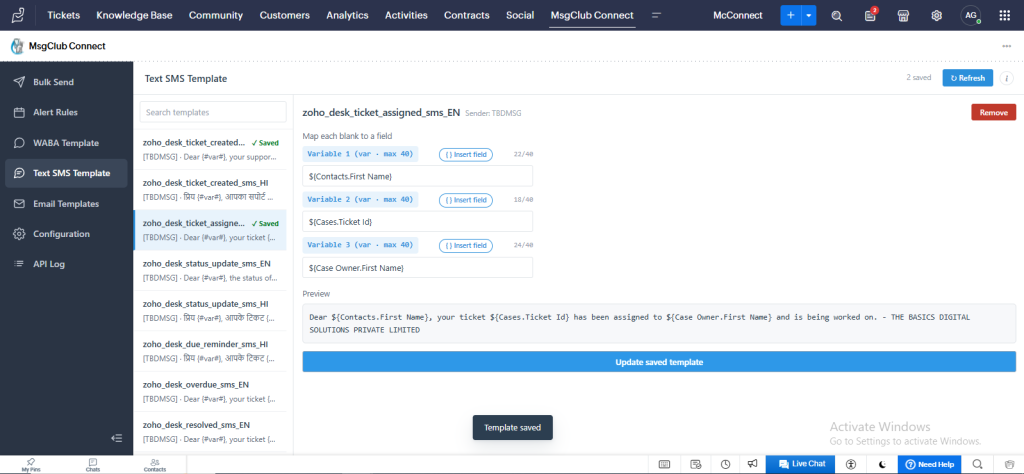
Text SMS Template screen. Your DLT-approved SMS templates (named starting with zoho_desk) are listed. Same naming rule and Refresh as WhatsApp.
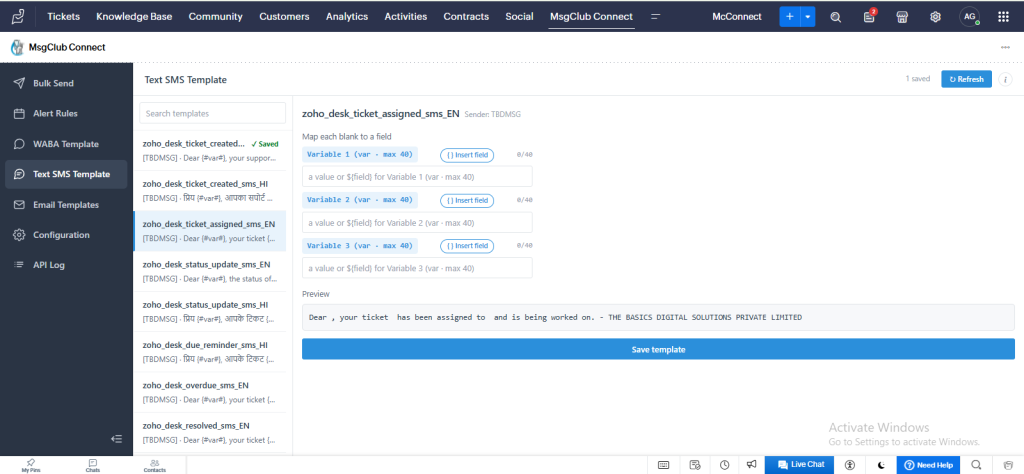
Pick an SMS template and map each blank (Variable 1, 2, 3 — each up to 40 characters) to a fixed value or a ticket field. A live Preview shows the final text.
Mapping done and saved — variables mapped to Contact First Name, Ticket Id and Case Owner. Click Update saved template; it shows a green Saved tag.
6. BULK SEND (MANY TICKETS AT ONCE)
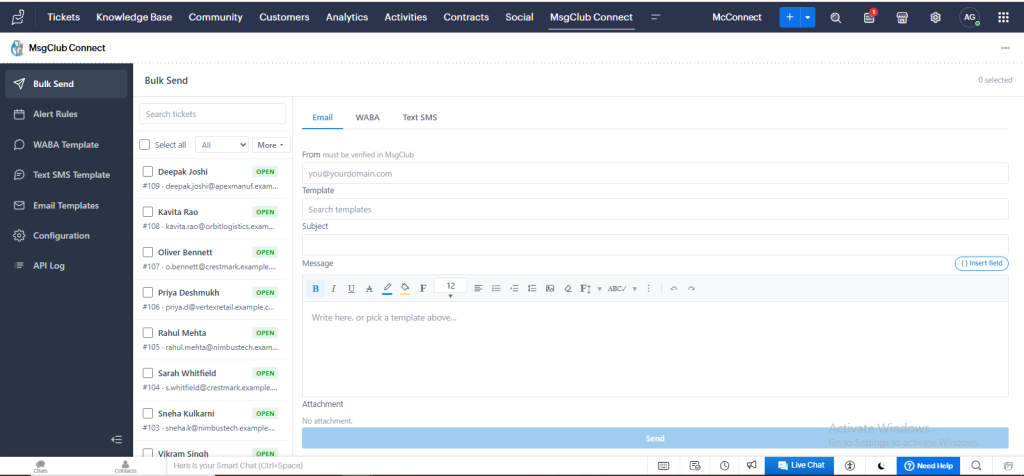
Send the same message to many contacts in one go. Tick the tickets on the left, choose a channel and template on the right, then send. Each contact still gets their own personalised copy.
Bulk Send screen. On the left, tick the tickets you want (or use Select all). On the right, choose the channel — Email, WABA or Text SMS.
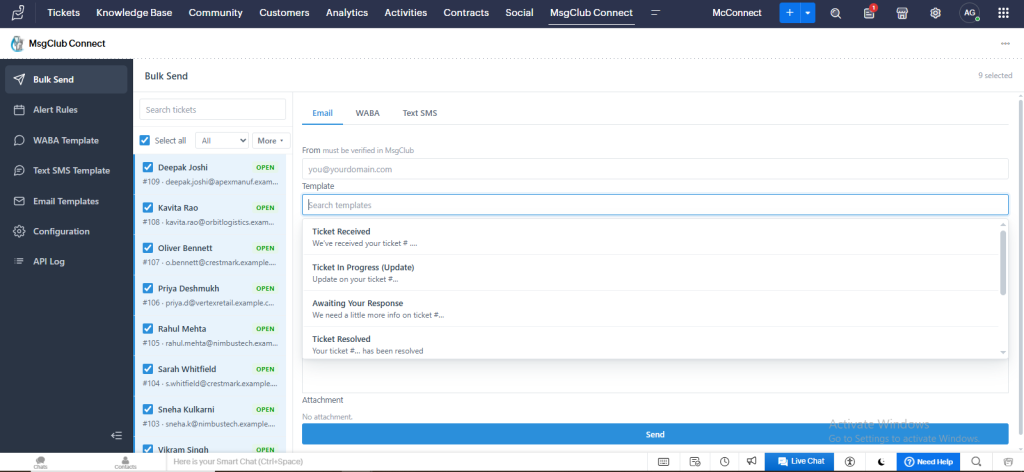
9 tickets selected. On the Email tab, pick a template or write the message; placeholders fill in for each contact.
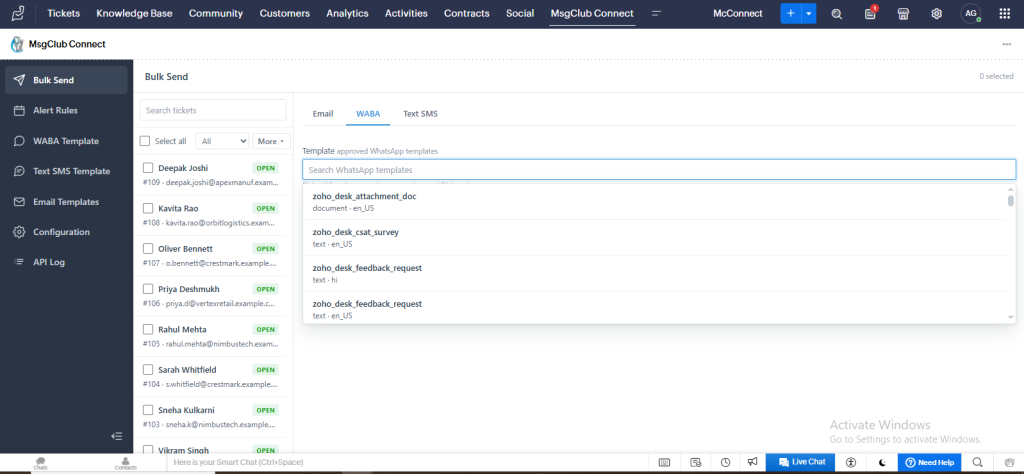
WABA tab in Bulk Send — search your approved WhatsApp templates to send to everyone selected.
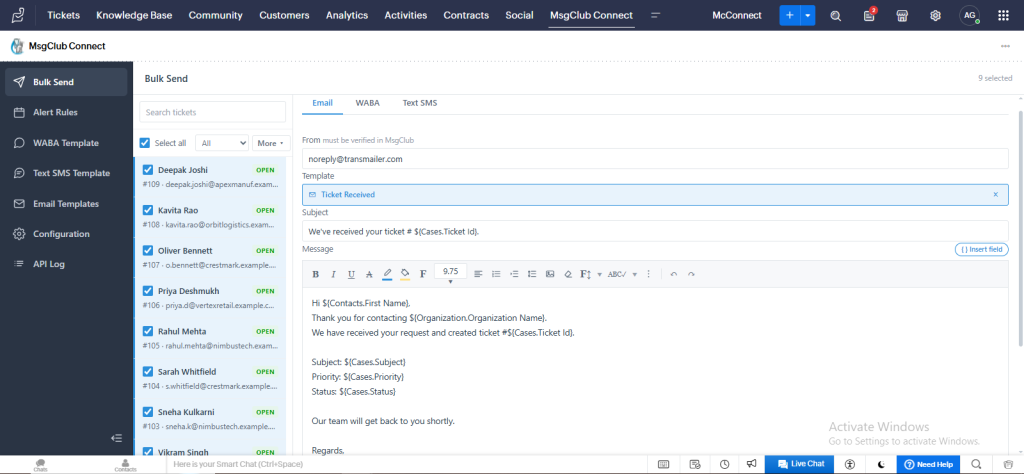
A bulk email ready to go: the From address is set, the Ticket Received template is loaded, and the message is personalised with each contact’s name and ticket number. Click Send.
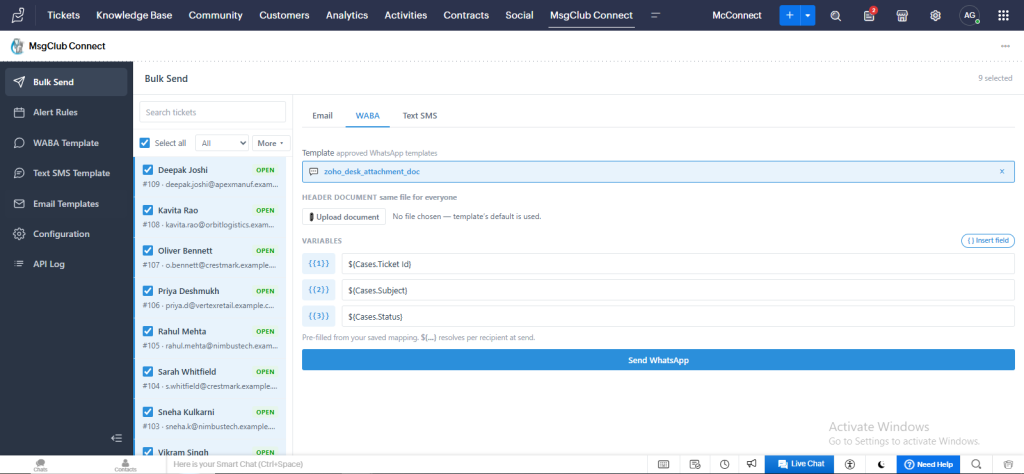
A bulk WhatsApp ready to go: template chosen and variables mapped to ticket fields; each recipient’s values resolve at send. Click Send WhatsApp.
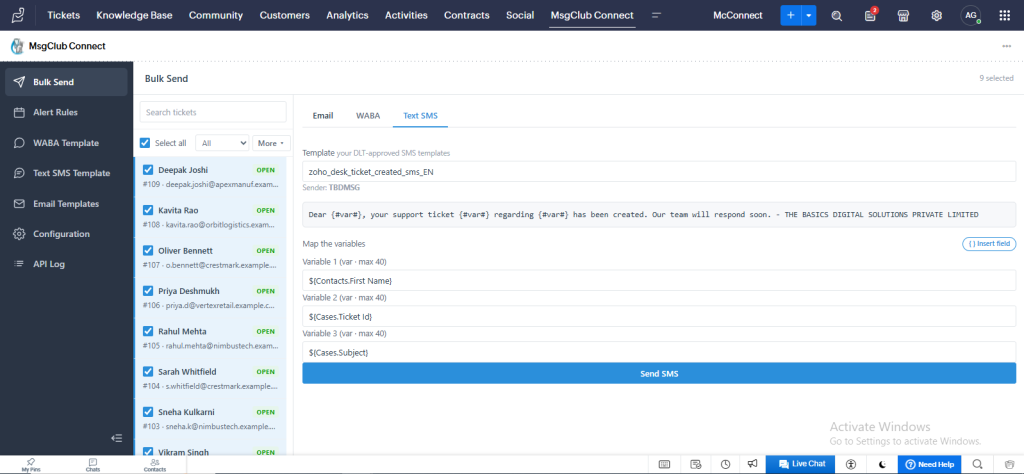
A bulk SMS ready to go: DLT template chosen, sender ID shown, and variables mapped to ticket fields. Click Send SMS.
7. ALERT RULES (AUTOMATIC MESSAGES)
Set up rules so messages send on their own — for example, a reminder one day before the due date. You define the rule once and the extension handles it.
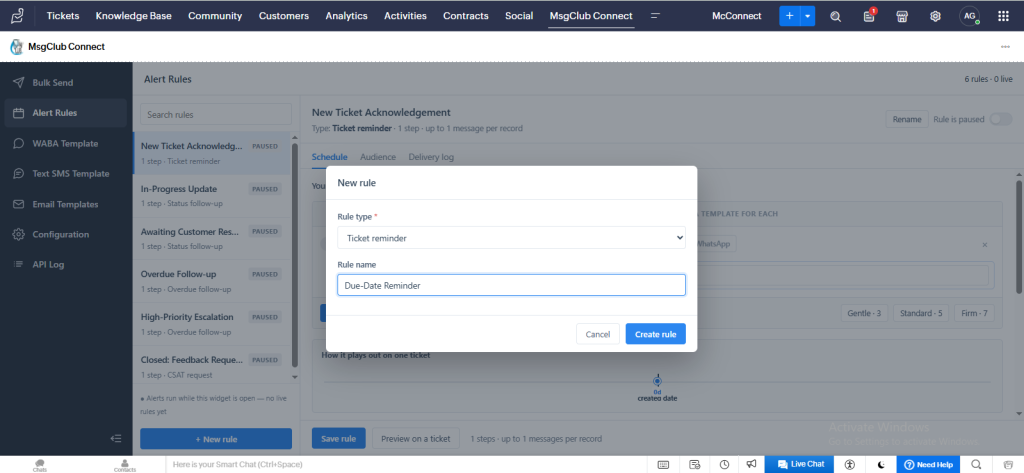
Create a rule. Click + New rule, choose a Rule type (e.g. Ticket reminder), give it a name (e.g. “Due-Date Reminder”), then Create rule.
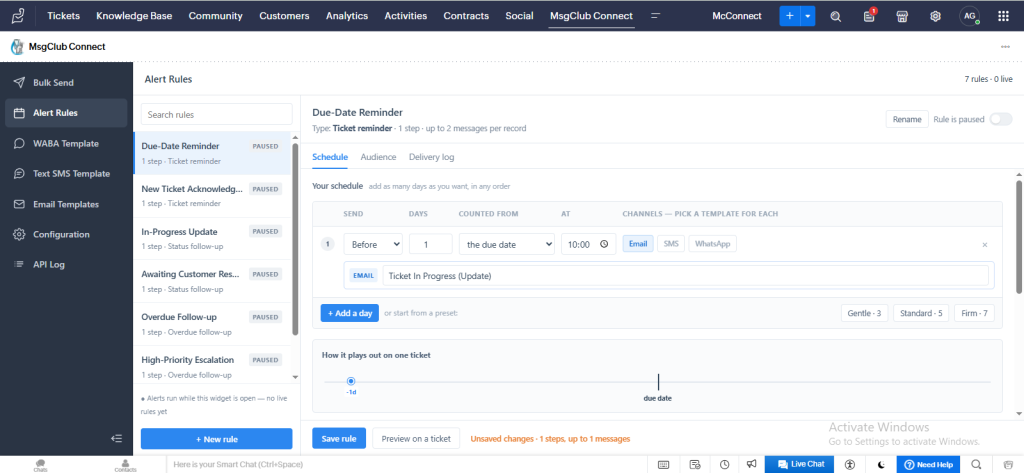
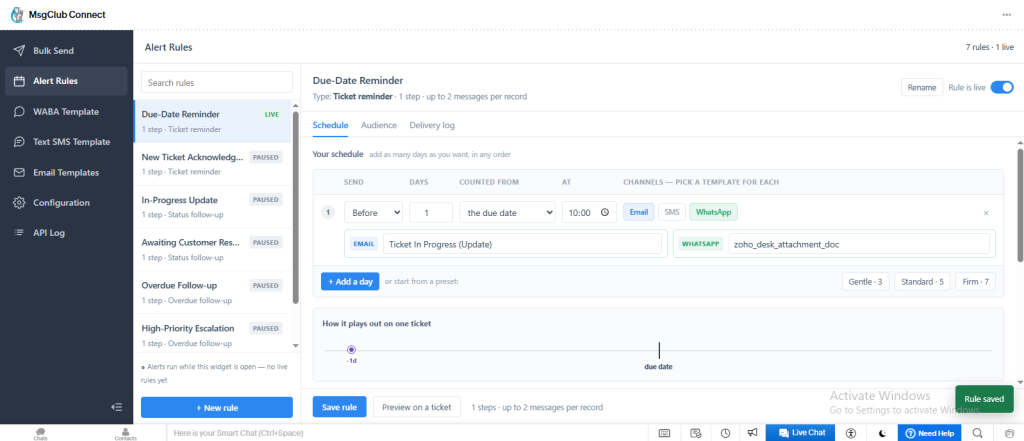
Schedule tab. Set when the message goes out — for example 1 day Before the due date at 10:00 — and pick a channel and template. You can add more days in any order.
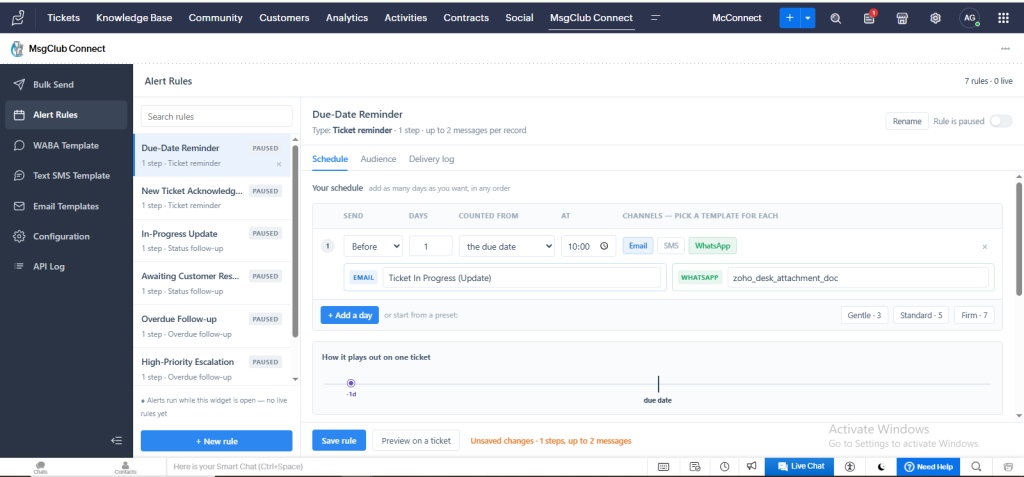
The same step with two channels chosen — an Email template and a WhatsApp template — so both go out on that day.
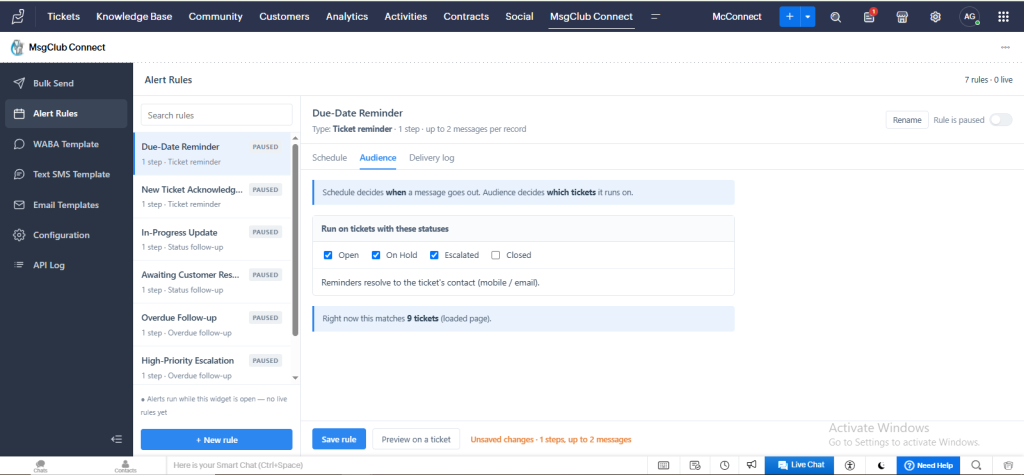
Audience tab. Choose which tickets the rule runs on by status (Open, On Hold, Escalated…). The screen shows how many tickets currently match.
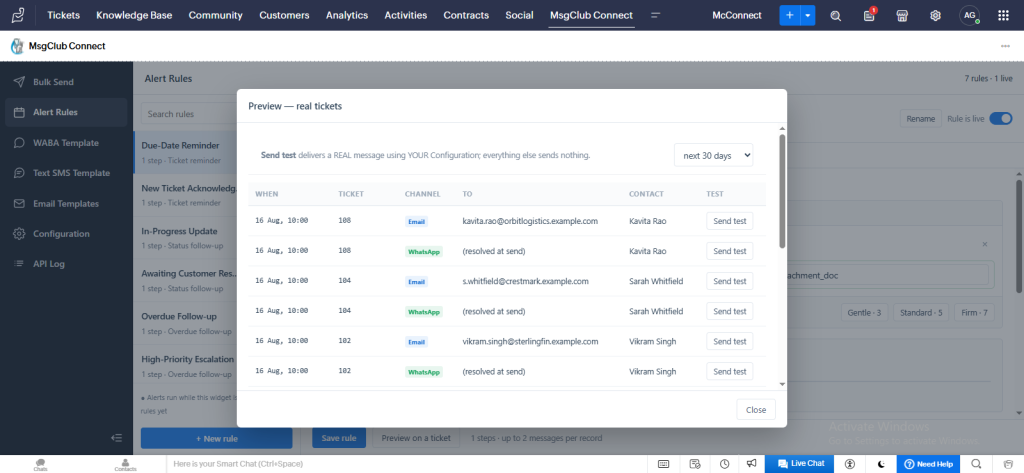
Preview on real tickets. See exactly who would get a message, on which channel, and when. Send test sends one real message to yourself so you can check it.
Turn the rule on with the Rule is live switch and Save. The rule now shows LIVE.
Delivery log tab. Shows what this rule has sent. The full request and response is in the API Log.
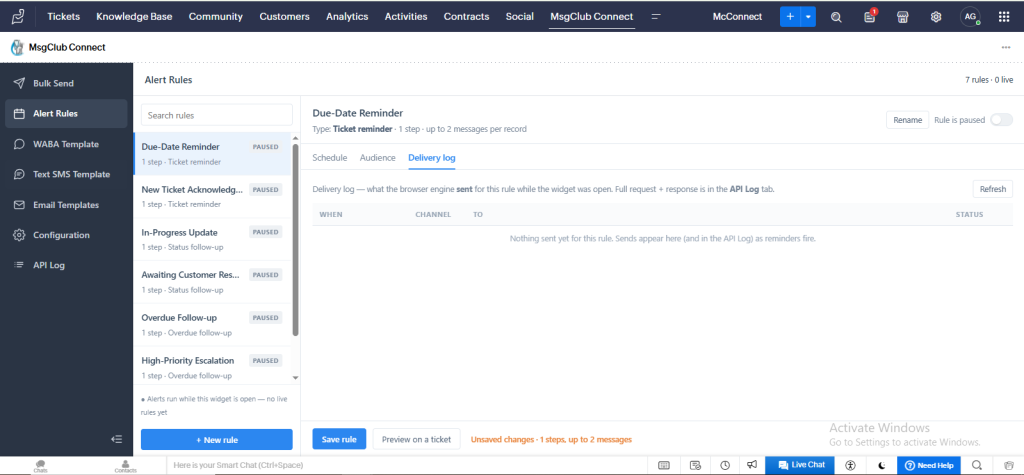
Alert Rules run while the MsgClub Connect widget is open. Keep the tab open for scheduled reminders to fire.
8. API LOG (SEE WHAT WAS SENT)
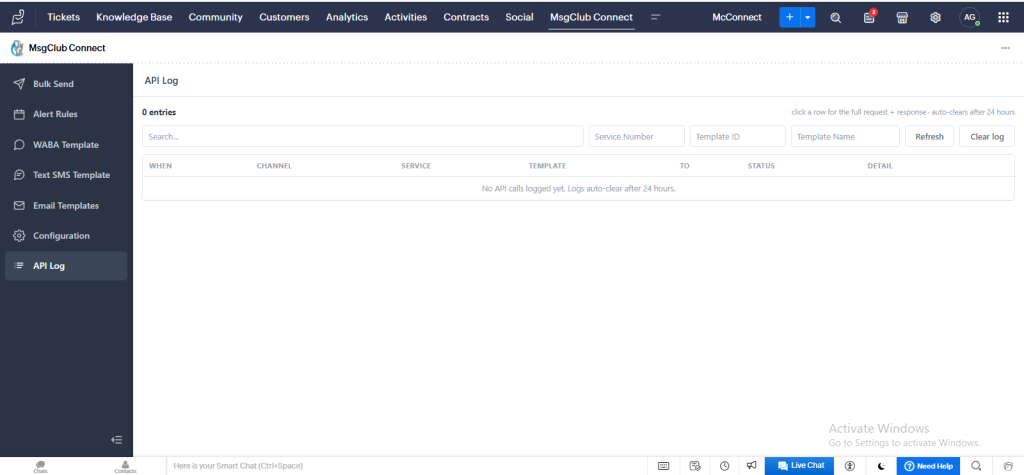
API Log lists every message the extension sent — channel, template, recipient and status. Click a row for the full request and response. Logs auto-clear after 24 hours. Your Auth Key is never shown here.
This guide shows how to use the extension day to day. For installation and setup (installing, authorizing, and entering your Auth Key), see the Admin Guide. For more help, see the Help Document or write to support@msgclub.net (support). For sales, contact sales@msgclub.net.