
A WhatsApp Chatbot provides your customers with a real-time automated conversational experience directly on the messaging app. With chatbot, you can send automated messages from your WhatsApp number to your customer instantly without any delay. People communicate with WhatsApp chatbot via the chat interface, like talking to a real person.
In MsgClub panel you can create chatbot that will be triggered when certain events are performed.
You can send WhatsApp message to your customer via chatbot. In MSGCLUB you can create a chatbot that contain a template which will be sent when certain keywords or response is given on any message.
Important Note – Before creating a chatbot, you must first plan and define the flow of how the bot will work. Only after your chatbot flow is ready should you proceed with creating the bot.
Also, make sure to create all required templates in advance before setting up the chatbot, as templates are used when creating the bot.
Learn More
Process Video
How to Create a Chatbot with Key Features Explained
Learn Chatbot Flow Design & Build Your Own Chatbot Step-by-Step
Step by Step Guide
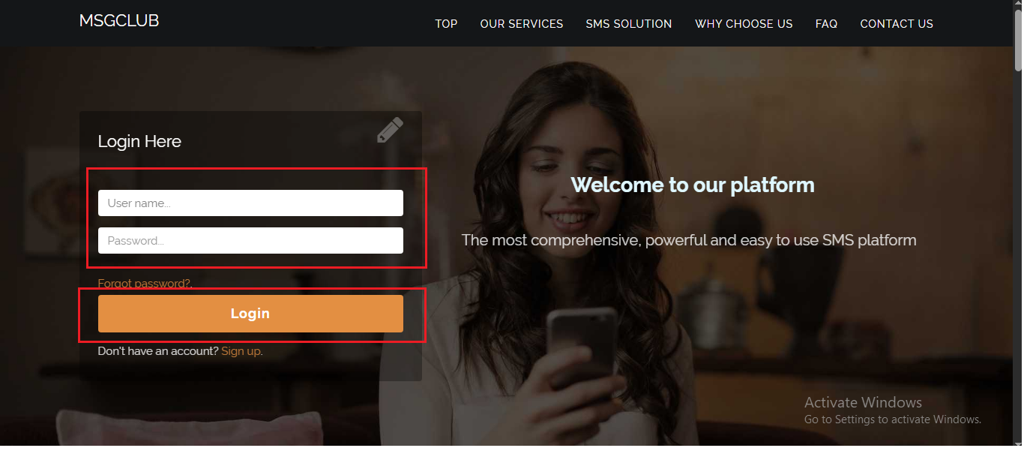
Step 1: Sign in to MsgClub using your Username and Password.
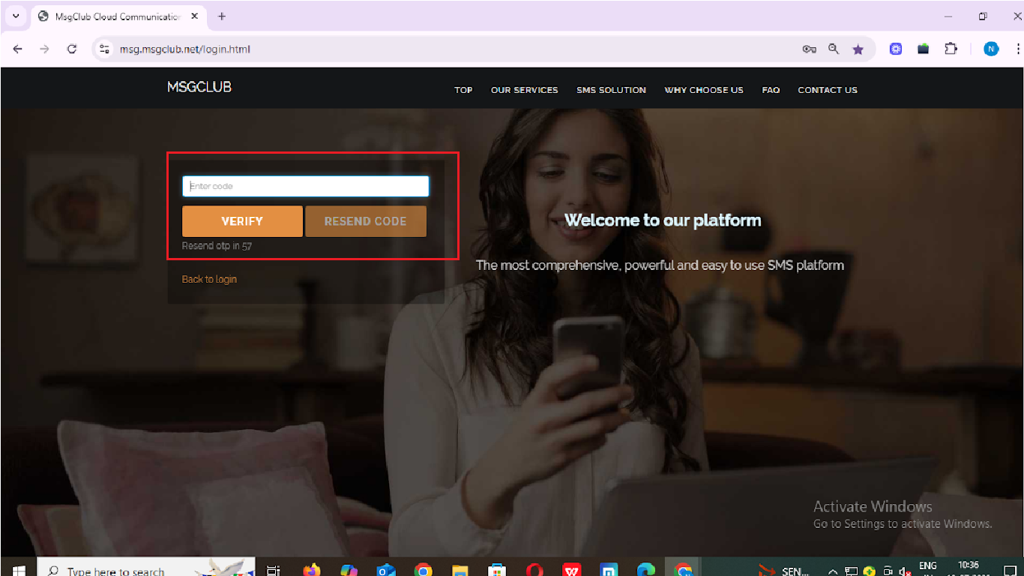
Step 2: You’ll receive an OTP on your registered mobile number. Enter the OTP and click Verify.
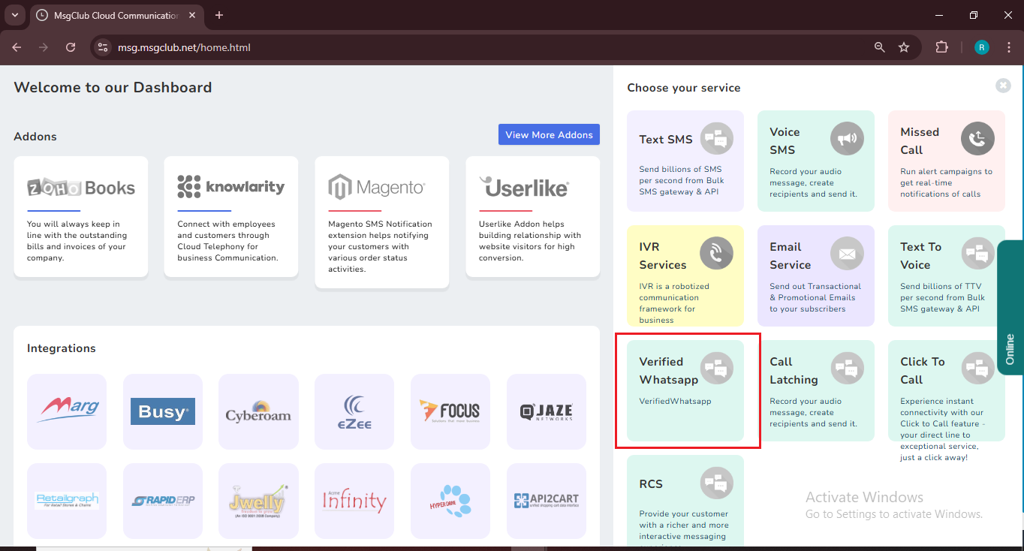
Step 3: From the Dashboard, select Verified WhatsApp Service.
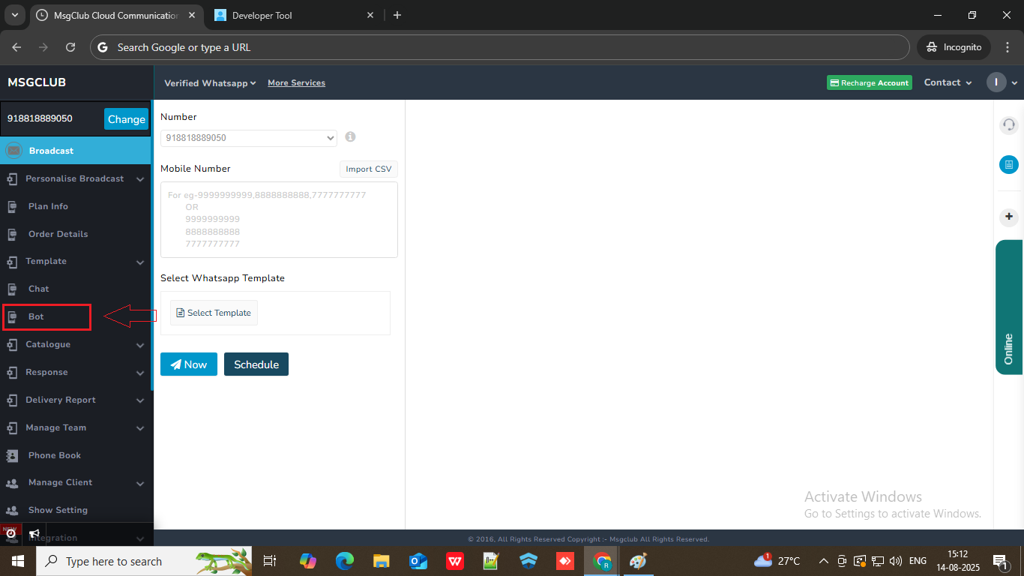
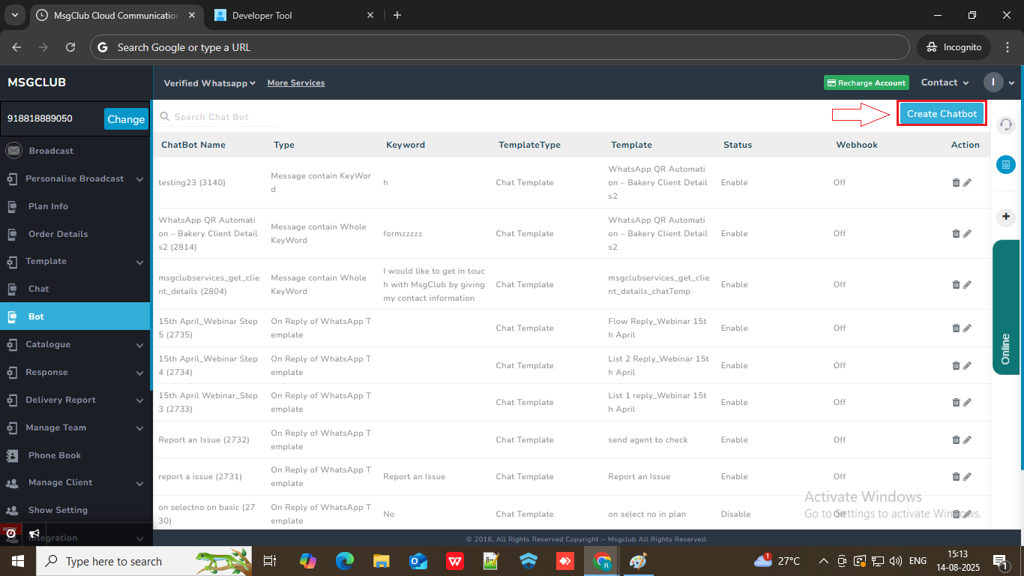
Step 4: In the left-hand panel, click on Bot.
Step 5: Click on the Create Chatbot button on the right side.
Note: You can only create a chatbot after creating the message templates you want to send. Chatbot messages are triggered by specific keywords or quick reply buttons, so make sure your templates are created and saved in advance for everything to work correctly.
Step 6: When you click on the ‘Create Chatbot’ button, a form page will open where you can create your bot by filling in a few details.
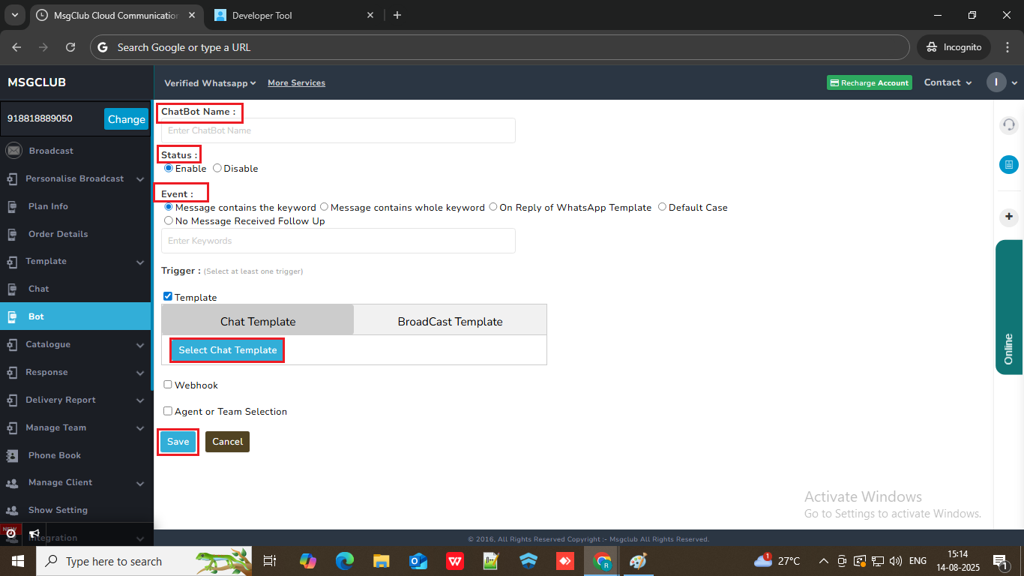
Step 7: In first field write your chatbot name here

Step 8: In Status, select “Enable” if you want your chatbot to work.
Note: Select “Disable” if you do not want the chatbot to run at the current moment.

Step 9: Now you need to select chatbot Event, in MsgClub we have five category.
Message Contains the Keyword
Use this if you want the chatbot to trigger when the customer’s message includes your chosen keyword, even if there is other sentence added.
For example, if the keyword is “Hi MsgClub” and the customer types “Hello MsgClub” or “Hi MsgClub team,” the chatbot will still respond.
After selecting this option, a text box will appear. Enter the keyword that should trigger the chatbot when it’s included in the customer’s message.

Message Contains Whole Keyword
if you want the message to be sent only when the customer types the exact keyword you’ve set. Example: If your keyword is “Hi MsgClub” and the customer replies with just “MsgClub”, the message will not be triggered.
After selecting this option, a text box will appear. Enter the exact keyword that should trigger the chatbot only when the customer’s message matches it exactly.

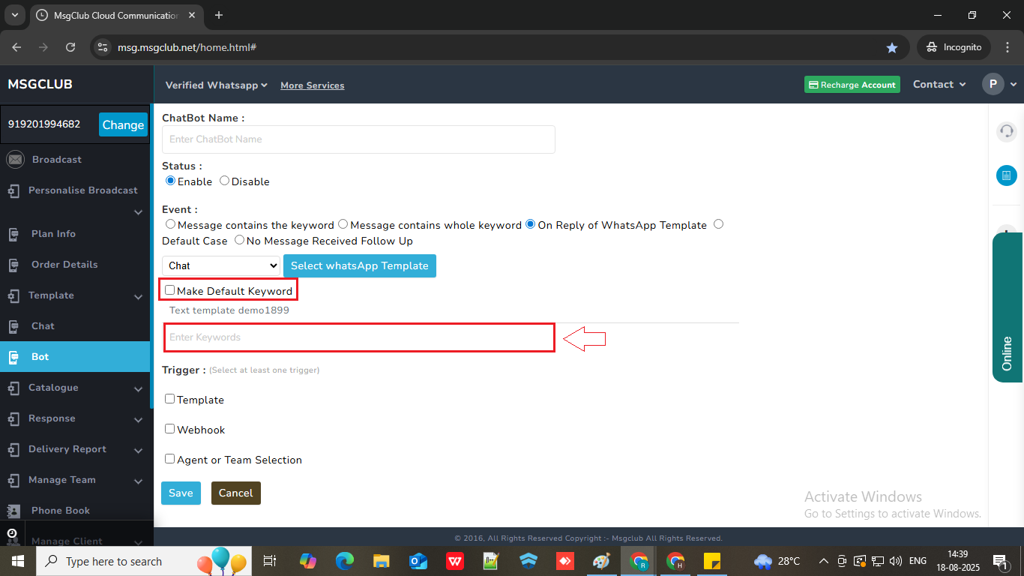
On Reply of WhatsApp Template
if you want the message to be triggered when the customer responds with a specific keyword to a particular WhatsApp template you sent earlier. Example: You send a WhatsApp template message that contains a list of products, asking the customer to reply with the product name they are interested in. When the customer replies with a product name (e.g., “T-shirt”), the chatbot will automatically trigger and send the corresponding pricing template message.
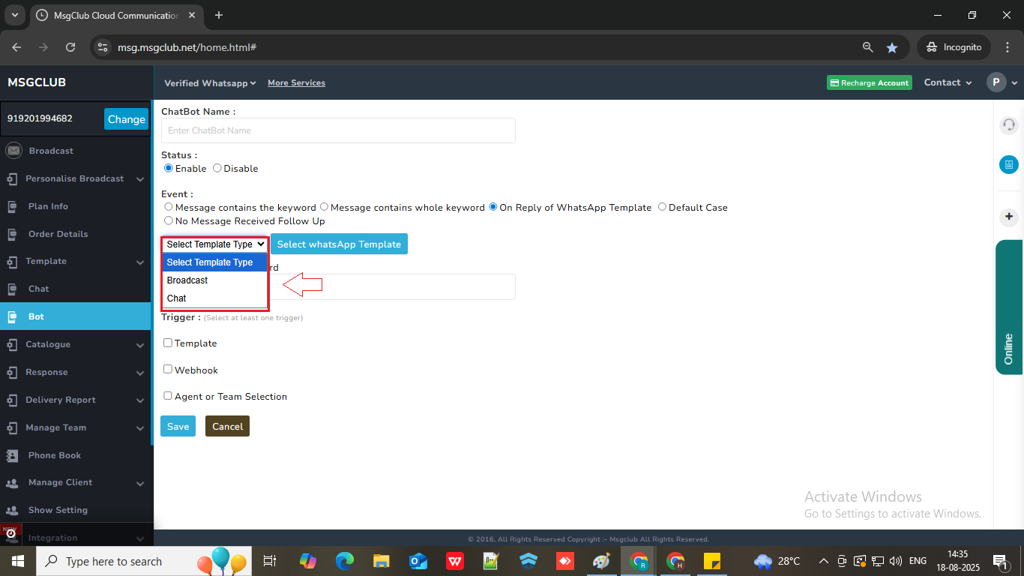
When you select this , a few option will appear.
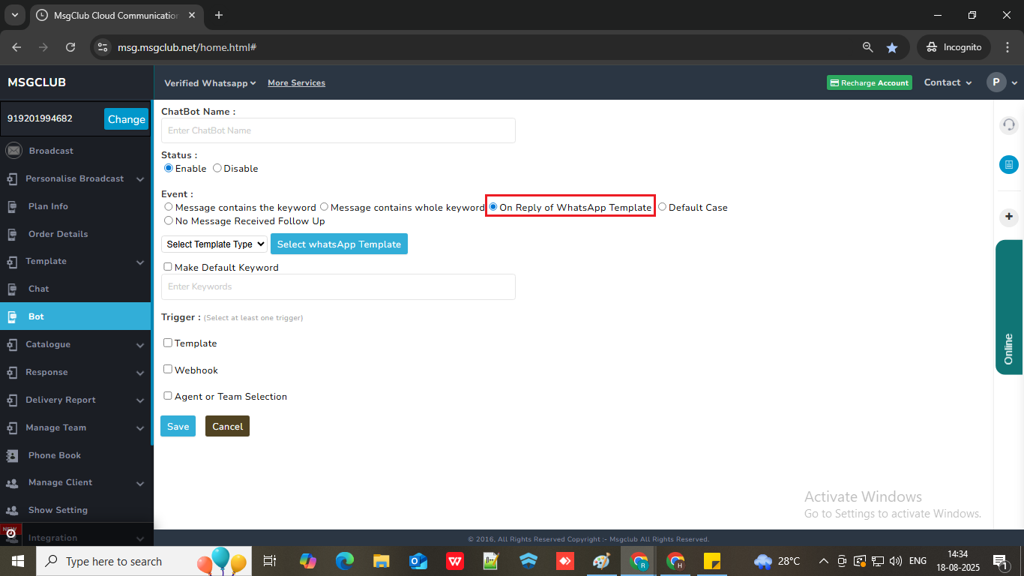
- First, choose the template type (Chat Template or Broadcast Template).
- Then click on the Select Template button — a popup will open showing the list of templates.
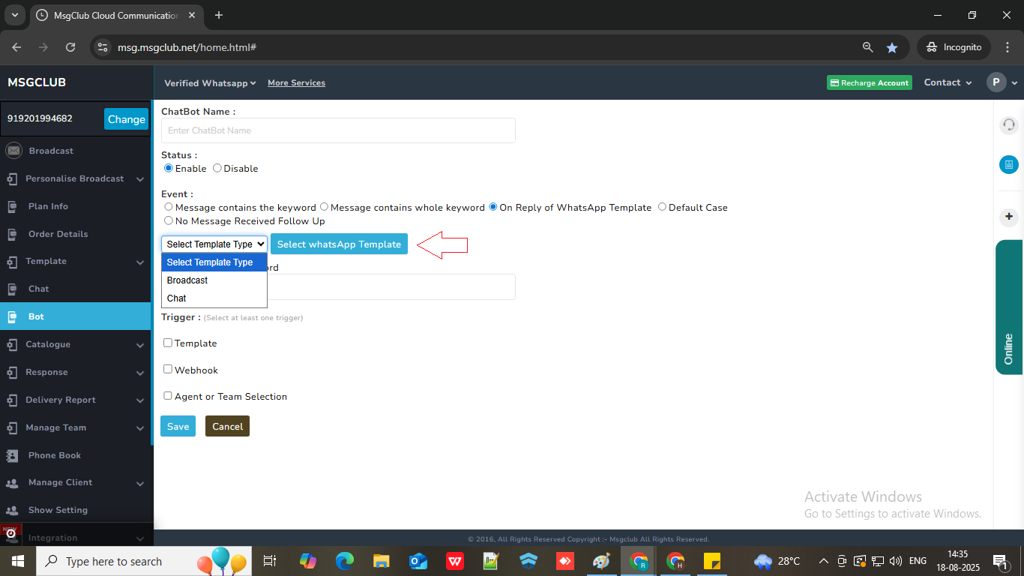
- Select the template for which you want to trigger a message when the customer replies.

- Enter the keyword that should trigger the chatbot, or select Default Keyword if you want the bot to trigger on any reply to that template.
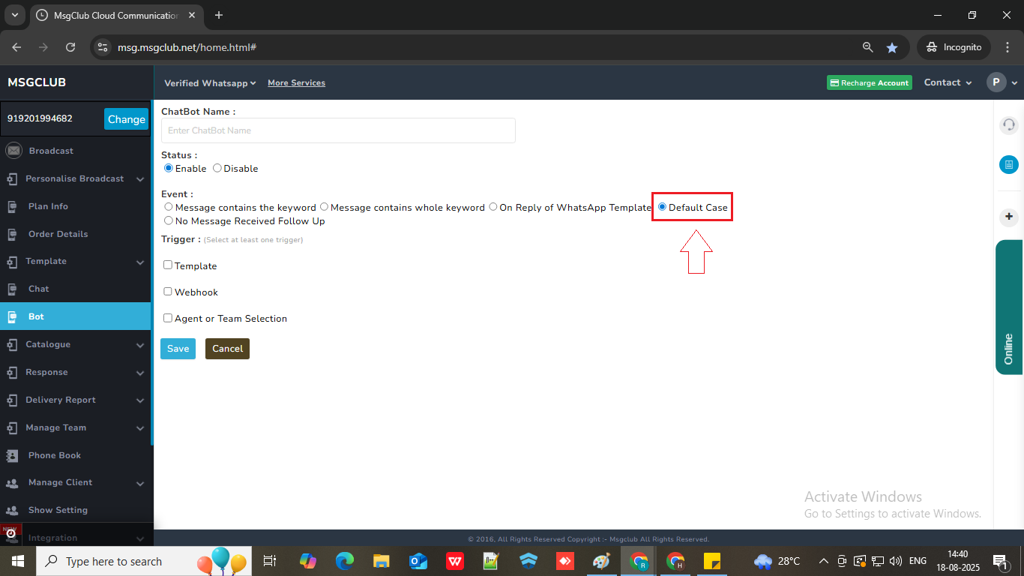
Default Case
if you want the chatbot to send a message for any reply received from the customer, regardless of keywords. This option allows the chatbot to respond to any message from the customer, regardless of keywords or templates. No further setup is needed.
No Message Receive Follow Up
Use this option if you want the chatbot to send follow-up messages when a customer doesn’t respond to a template that was sent. For example: if you’re an e-commerce business and you send product details asking the customer to reply with the product they want to buy, but they don’t respond — this feature will automatically send them follow up messages at the time you’ve set.
When you choose this , few options will appear.
- Select the template type (Chat Template or Broadcast Template).
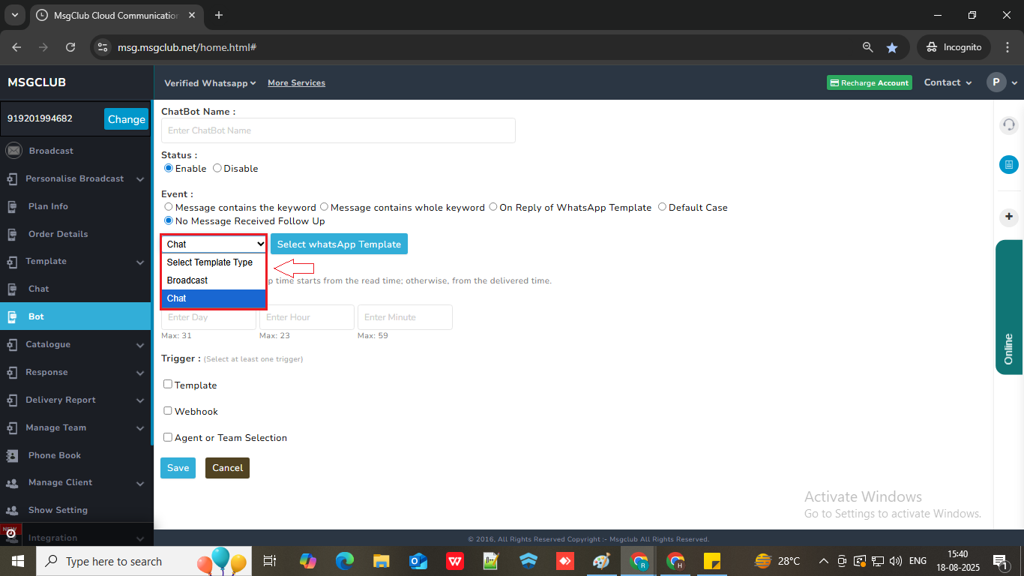
- Click on Select Template — a popup will open where you can choose the template on which if the customer don’t reply then you want to send a follow up message .The chatbot will send a follow-up message if the customer does not reply to that template.
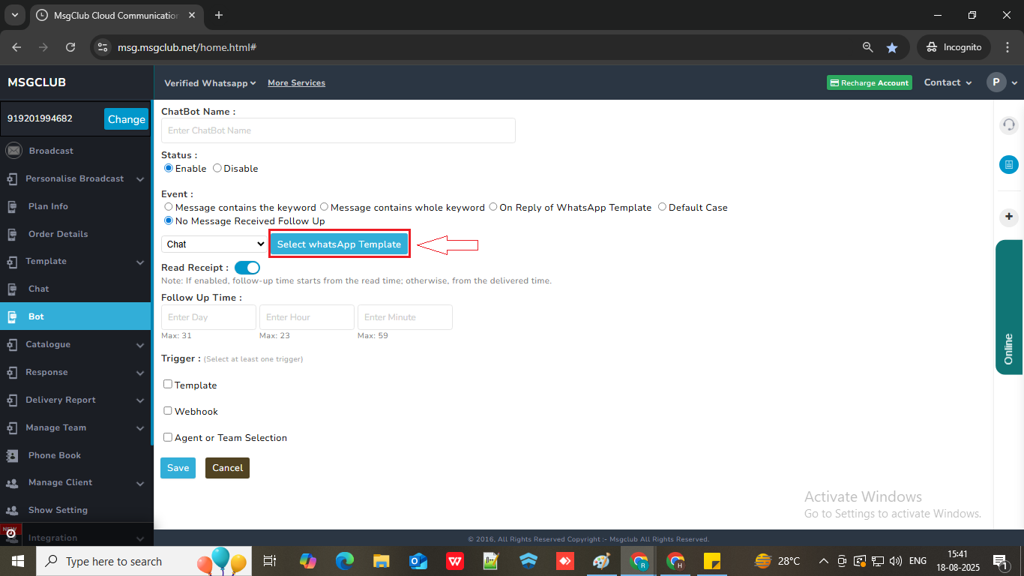
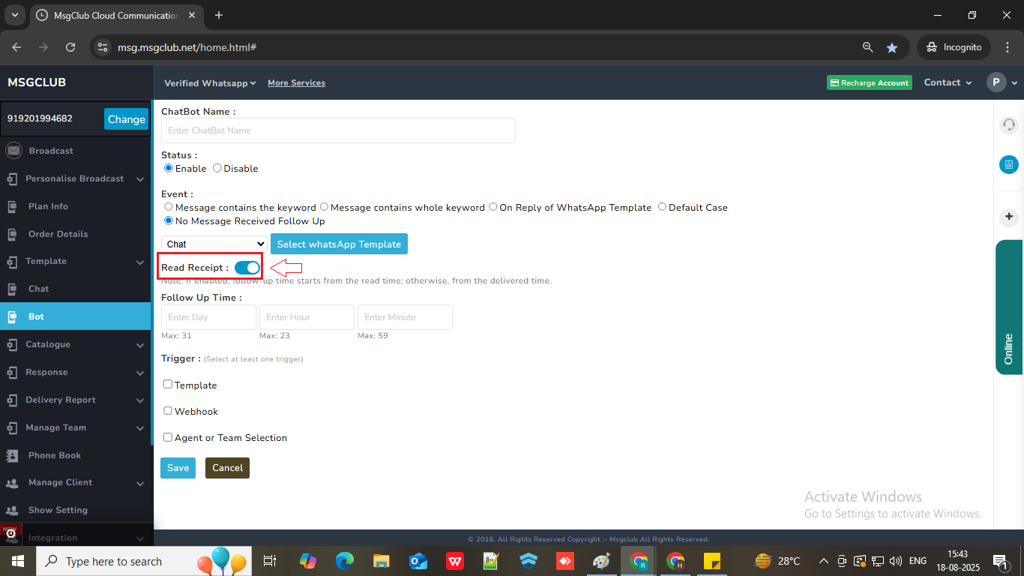
- You can also enable Read Receipt — if turned on, the follow-up timer will start from the time the message was read. If not enabled, it will start from the delivery time.
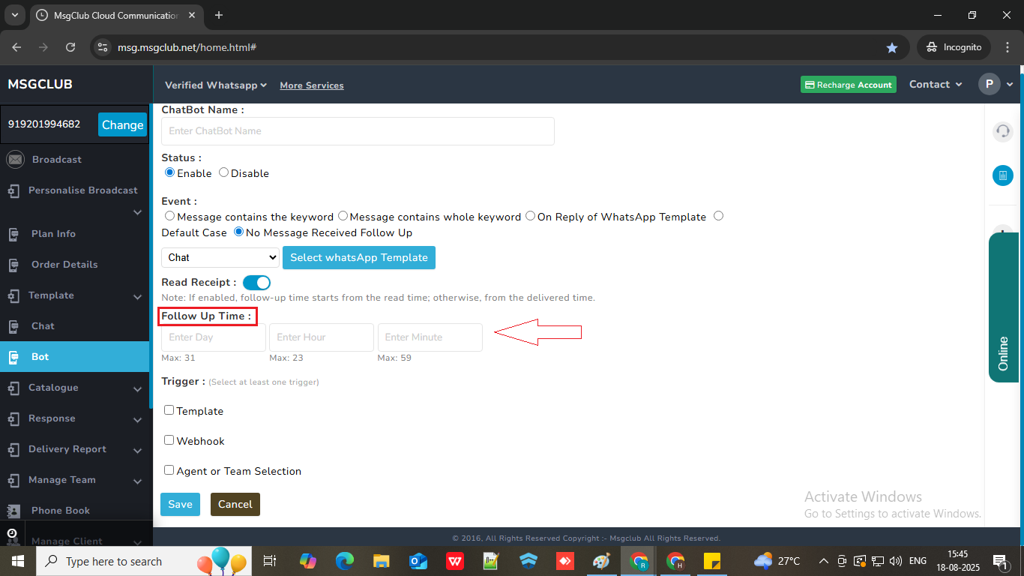
- Set the follow-up time in days, hours, or minutes. For example, if you want the reminder to be sent after 2 days, enter “2” in the days field.
Step 10: After selecting the event type, you’ll see three trigger options — Template, Webhook, and Agent or Team Selection. You must choose at least one to create the bot, and you can also use all of them together if needed.
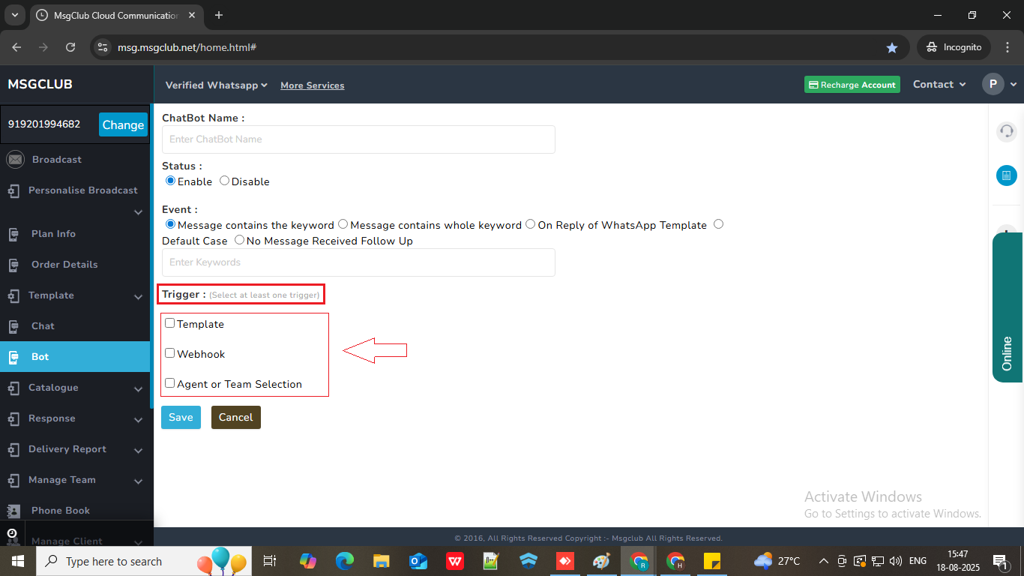
Template
Step 11: If you want to send a message template to customer then check the “Template” checkbox to proceed with selecting a message template.

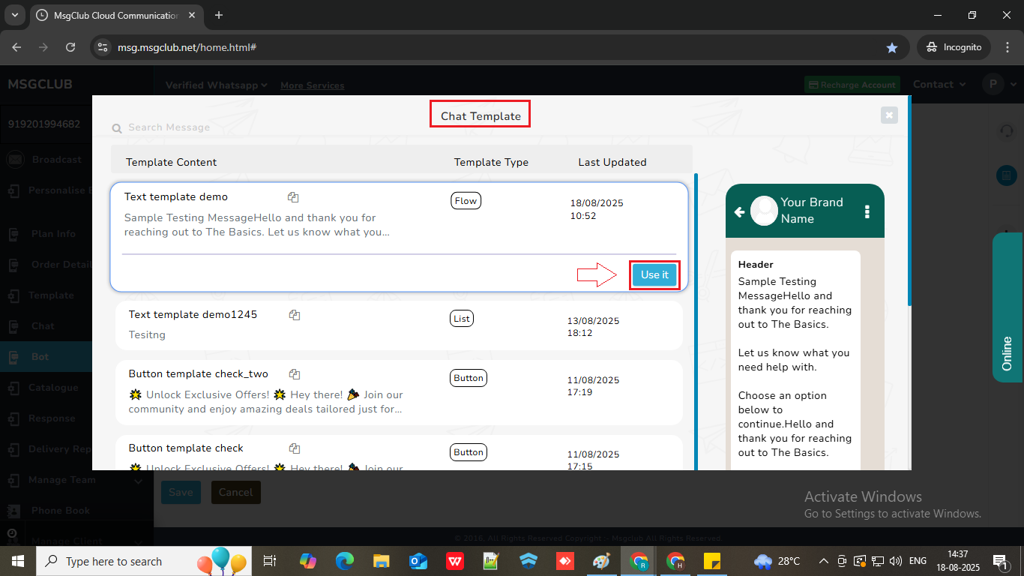
Step 12: After checking the Template checkbox, two options will appear — Chat Template and Broadcast Template. Select the one you want to use, then click the “Select Template” button within that tab.
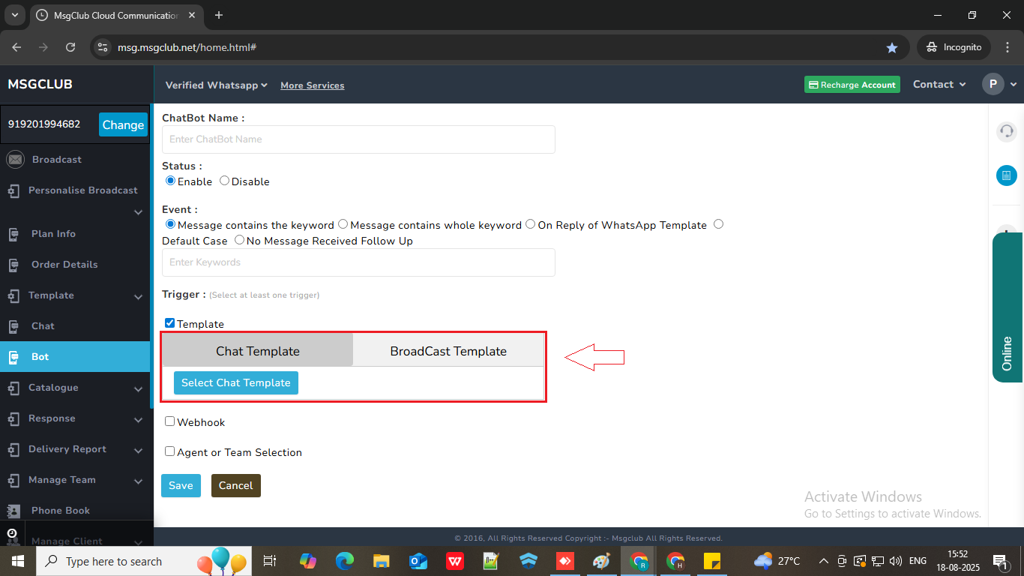
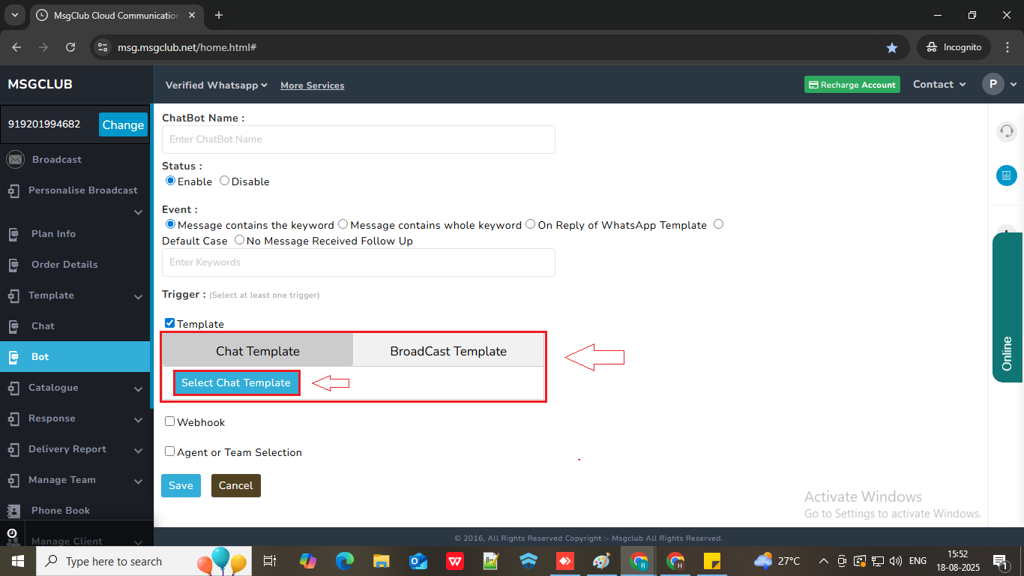
Step 13: When you click on “Select Template,” a popup will open showing the list of templates. Click on the template you want to use, then click the “Use It” button to select it and your template will be selected.

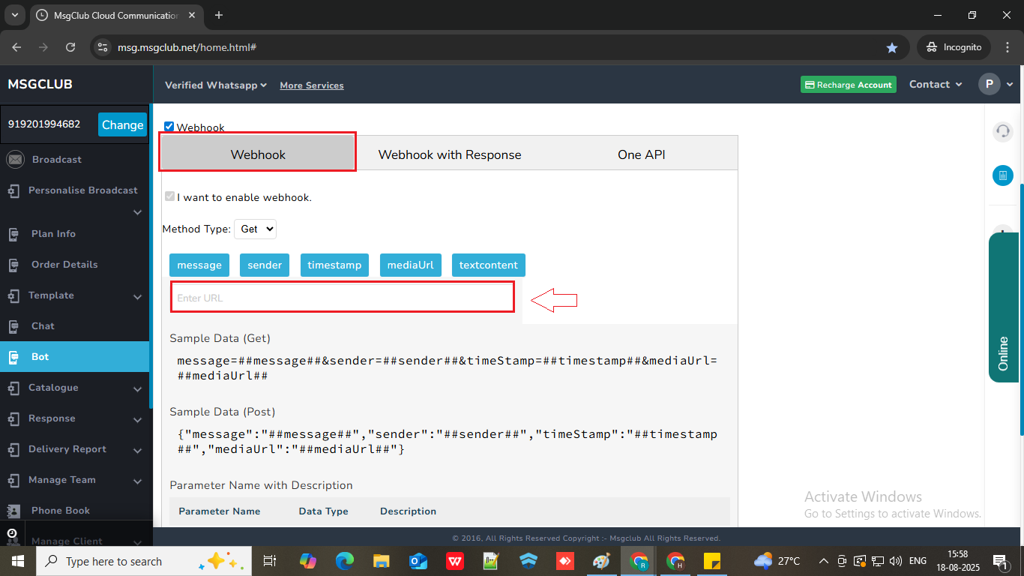
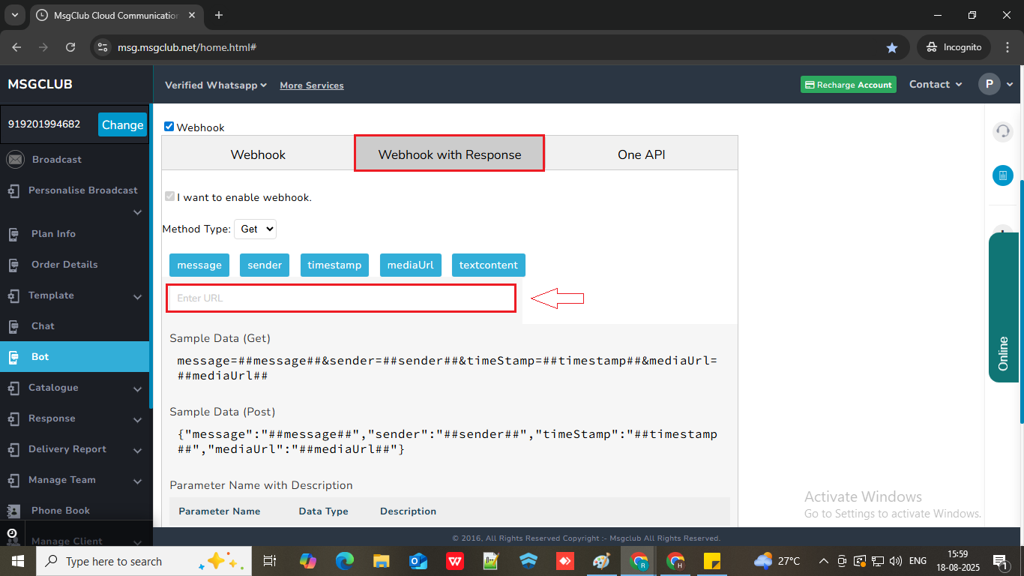
Webhook
Step 14: If you want to use the Webhook feature, check the Webhook checkbox. You’ll then see three options:
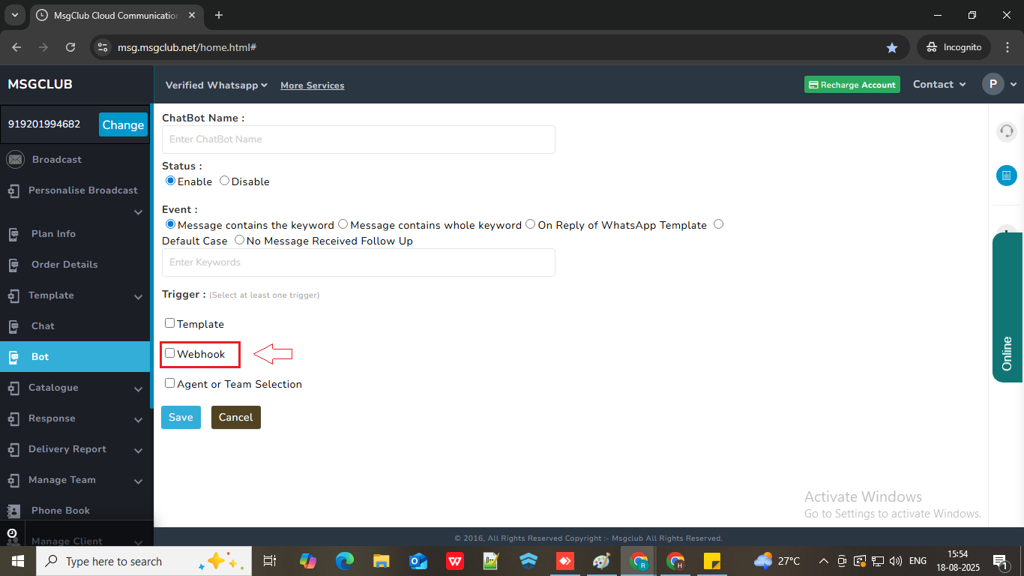
- Webhook – Select this if you want the customer’s chatbot response to be pushed to your own system (e.g., CRM).
- Webhook with Response – Select this if you want to push the customer’s response to your system and also send an automated reply using MsgClub services like SMS, voice messages, or emails.
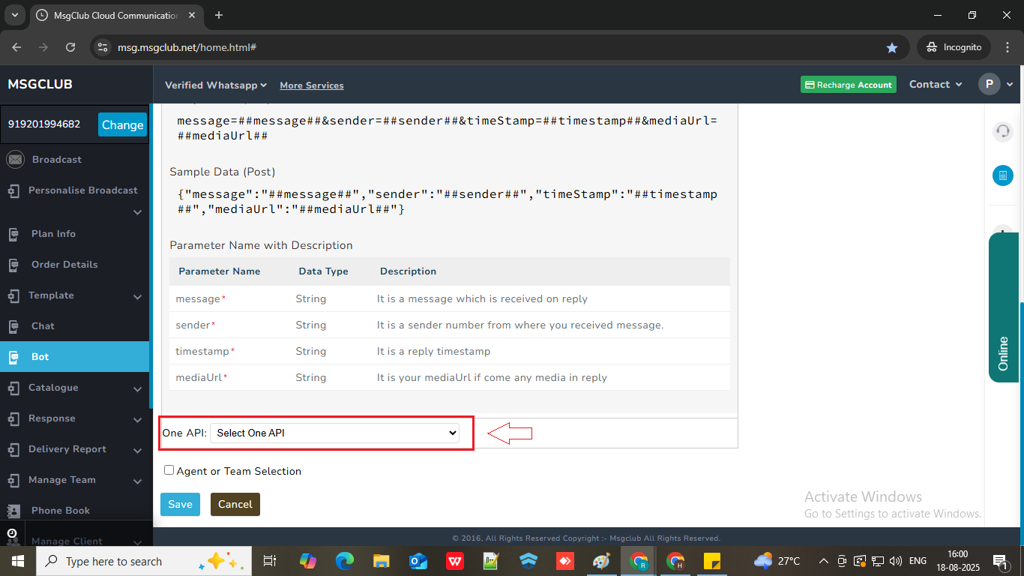
- One API – Choose this if you want to automatically respond to any customer message using other MsgClub services such as SMS, voice calls, or emails.
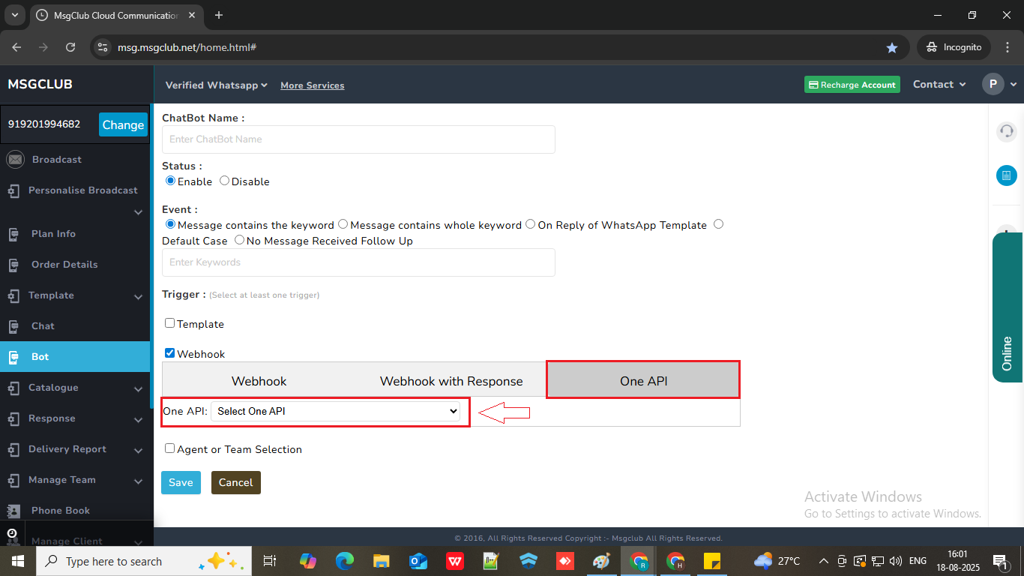
Note: MsgClub will set up the One API so that you can use various services for automated customer responses.
Agent or Team Selection
Step 15: if you want to assign this chatbot conversation to a specific agent or team then click on “Agent or Team Selection” checkbox.

- This option allows you to control who can view customer chats in MsgClub Verified WhatsApp . For example, if you assign an agent for when a customer replies with “Hello,” only that agent will see the conversation. If you assign a team, chats will be assigned to one agent at a time within that team, not to the entire team. The system assigns chats in a rotating order, starting from the first agent added to the team and moving down the list. This ensures that conversations are distributed evenly among team members.
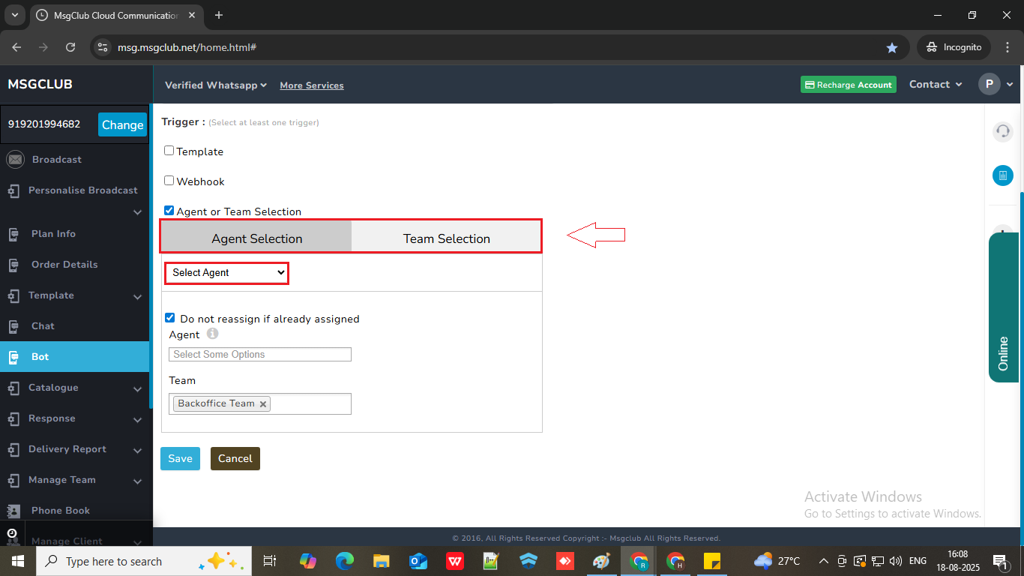
- If you don’t want the chat to be reassigned in case it’s already assigned to someone, make sure to enable the “Do not reassign if already assigned” option and select agent or team whose chat will not be reassigned even if we select Agent or team from the above option.

Step 16: Once you have filled in all the details, click on the Save button. Your bot will be saved and displayed in the list. You can create multiple bots one by one by following the same process.

Once all required bots are created, your complete chatbot will be ready, and when a customer sends a message, they will be able to interact with the bot automatically.
FAQs
Q. What is a Chatbot?
Ans: A chatbot is an automated messaging tool that allows you to interact with customers through predefined messages. It responds to customer queries or actions without requiring manual input every time.
Q. What is the use of a Chatbot?
Ans: A chatbot helps you automate customer communication, save time, and offer instant replies. It can guide users, share information, collect data, and improve customer support without human intervention.
Q. Can I automate messages in WhatsApp?
Ans: Yes, using MsgClub’s WhatsApp Chatbot, you can automate replies and send messages based on customer interactions, saving time and improving response efficiency.
Q. Can I send automatic messages to customers when they reply with certain word?
Ans: Yes, you can configure the chatbot to detect specific keywords in customer messages and automatically send a message template when those keywords are used.
Q. Do I need technical knowledge to set up a chatbot?
Ans: No, MsgClub provides a user-friendly interface where you can create and manage your chatbot without any coding. Just set your flow, triggers, and responses.
Q. What is a trigger in a chatbot?
Ans: A trigger is the condition that activates the chatbot response. For example, when a customer types a keyword like “Pricing” or clicks a quick reply button, the chatbot responds with the message or template you’ve set for that trigger.
Q. Can I use media files (images, videos, PDFs) in chatbot replies?
Ans: Yes, MsgClub supports media in chatbot templates. You can send images, videos, PDFs, buttons, and more as part of your automated replies.
Q. What happens if a customer sends a message that doesn’t match any keyword?
Ans: In that case, you can configure a default chatbot message that replies to any unmatched or general message from the customer.
Q. Can I track how the chatbot is performing?
Ans: While MsgClub does not provide separate logs or reports specifically for chatbot performance, you can still track interactions through the Chat section. There, you can monitor customer replies, chatbot-triggered messages, and template deliveries to understand how the bot is functioning.